Section outline

    • Styled objects save you time because you can pre-set and save their parameters. With slab styles, you can pre-set your common slab assemblies with all the associated graphics and data.

      This course will examine the key settings of the Edit Slab Style dialog for a basic slab style. While this dialog shares the same parameters as the Slab Preferences dialog, one critical distinction must be made.

      SLAB PREFERENCES
      Editing the Slab Preferences dialog will have no impact on existing slabs. The Slab Preferences dialog affects future slabs drawn with the Slab tool, but it does not save those settings—that is, not unless the Save Preferences as Slab Style button at the upper right of the dialog is clicked, which will prompt you to assign a name to your new slab style.

      EDIT SLAB STYLE
      When creating a slab with the Slab tool, you can select a slab style from the dropdown at the mode bar (located at the upper left of the drawing window). However, you edit slab styles through the Edit Slab Style dialog. Remember: Editing a style affects all slabs assigned to that style, whether already in the file or yet to be created. Using slab styles is highly recommended for efficient workflows.

      Note: This feature's more advanced settings are covered elsewhere or within the relevant certification course. For more extensive information on this feature, remember you can also access Vectorworks Help.
    • The Definition tab of the Slab Style dialogue


    • KEY FEATURES

      At the top of the dialog, you will see a section diagram of your slab style. It shows the slab's components.

      Overall Thickness: This field is inactive (greyed) for Slab styles because the overall thickness is the product of the slab's component thicknesses. All slab objects have at least one component.

      Edit Slab Attributes

      Slab Attributes: The parameters of this dialog allow you to set fill and pen attributes for the slab. Click the Make all Attributes by Class button to defer to the slab object's class settings.

      Datum: Set whether the datum is the top or bottom of the selected component. The selected component shows an icon in its row beneath the Datum column. Select a different component by clicking on another component's row in the Datum column. You can also toggle between Top-of-component and Bottom-of-component settings by clicking the icon.

      Drainage: Your selection here determines whether the entire slab (Fixed thickness slab) or only the specified component (Tapered component) will slope to accommodate drainage elements.

      Components: Add, edit, duplicate, delete, and sort your components here. You can edit specific cells directly (click the cell) or by selecting one or more components and clicking the Edit button below. (Remember: Slabs require one component minimum to function.)

    • ADDING COMPONENTS
      Click New to add components to your slab.

      Slab Component Settings

      Definition: Set the component's defining features. A new component needs a Name and Thickness at minimum. If a Material is selected, the component can automatically derive its Section Fill, Texture, and Lambda value from that Material.

      Section Fill, Section Pen, and Texture: The graphic appearance of the component can be

            • set by Style (set Material to None, click Remove by Class Settings, and edit the fields manually),
            • set by Class (select a Class from the Definition dropdown, set Material to None, and click Make all Attributes By Class), or
            • set by Material (select a Material in the Definition field).

      Note: When a Material is assigned to a component, the Material's attributes override the Section Fill and Texture. However, you can still change to a different Texture while keeping the Material active.

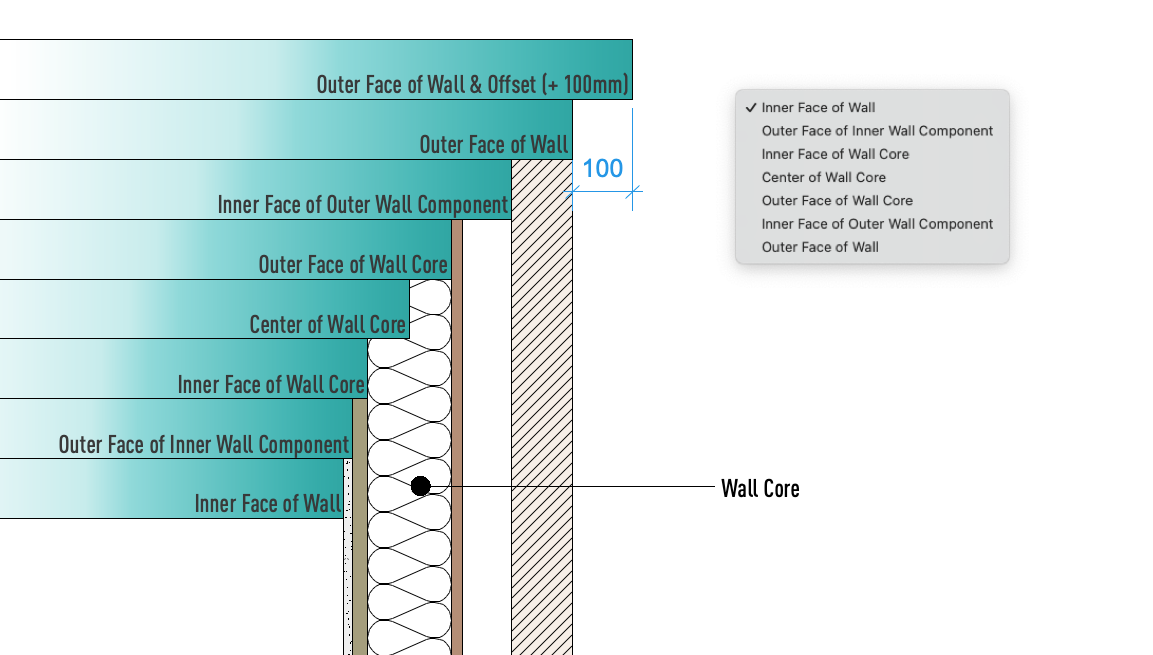
      Edge Offset: Here, you can set an Auto-Bound reference for a slab component when the slab object has wall associations. When a wall association is active, the slab component's edge will offset to meet a designated face within the wall assembly. You can also apply an Offset value to the Auto-Bound reference. You can also enter an edge offset value in the Manual field, used when no wall associations are present.

    • A diagram f the different offset optons for slab components relative to a wall object

    • Master Snap Points:  These checkboxes allow you to activate a snapping priority for the top and/or bottom of a component. This is usually done for structural components to make dimensioning easier.
    • the Insertion Options tab of the Slab Style dialogue


    • KEY FEATURES

      Height: Here, you can align the datum of your slab to a specific Z reference, either to the Layer Elevation or to a Level Type if you are using Stories. You can also enter an offset value from that Z reference.

      Drainage Settings: Click to open a separate dialog where you can configure the default slab drainage settings and select a default drain symbol for the slab style.

      Energos: This is only needed if you plan to run an Energos evaluation of your design. It requires Vectorworks Architect or Design Suite.
    • The Slab style dialogues Texture tab


    • As a rule of thumb, click Use component textures when you have component textures; click Use object textures when you don't. 

      The Part dropdown and Texture swatch immediately below work together. When Use object textures is selected, you can assign textures to individual parts of the slab, or to the slab object overall (see the Part dropdown).

      Textures can be applied from the object's Class settings when clicking the Texture swatch and then clicking By Class at the top of the popover. But you may still wish to apply an override here, especially as each part of the slab can have a different texture. (Some existing styles may already have an override applied.) 
    • The Slab Style dialogues Data tab


    • Mark: Values entered in this field can be searched and reported in Data Tags, Reports (Worksheets), and Graphic Legends. A unique and abbreviated identifier is typically entered here, especially as an alternative to the Slab Style Name, which can become quite long.

      Whether you enter values for the other fields depends on your workflow. Add data if it is useful to you. Otherwise, leave it be and save yourself some time—you can always add it later!
    • ⓘ For BIM and more advanced workflows, additional data can be added to slabs and other objects via the Data Manager, though all your building shell tools already have IFC mappings.